I fell into this tiny OLED TV trick purely by accident while testing gadgets for a cheeky little “make-almost-anything-look-good-on-camera” guide. I wanted to shoot a short film on a shoestring and—spoiler—lighting will only get you so far. What I found was that placing a compact OLED TV behind the action, used as a dynamic light source and background, instantly imparted that glossy, cinematic texture you usually see in higher-budget indie films. It’s cheap, flexible, and oddly addictive once you start experimenting.
What is the tiny OLED TV trick?
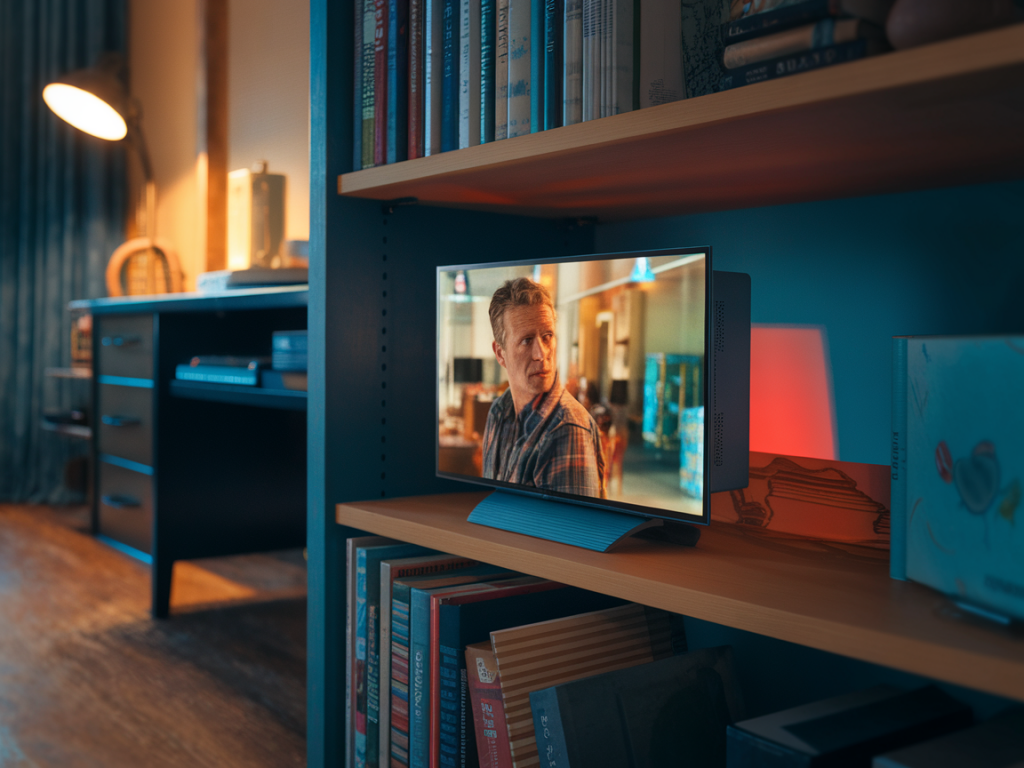
At its simplest: you use a small OLED television (think 24–32 inches) as a controlled light source and background element to shape color, contrast, and reflections in a scene. Because OLED panels have true black levels, wide viewing angles, and rich colors, they behave more like a practical light than a standard LCD. That means you can place it behind or beside your subject to create cinematic separation, moody rim light, or realistic practicals—without blowing your budget on studio lights.
Why OLED over LCD or LED panels?
OLED is different because each pixel emits its own light. That gives you:
True blacks — parts of the image can be completely off, so the TV won’t backlight and ruin shadow detail.High contrast — colors pop against deep shadows, mimicking the dynamic range of cinema monitors.Wide viewing angles — the light looks consistent even as actors move around the frame.In contrast, typical LCD screens have backlights that can cause a washed-out glow and uneven illumination.
How I set it up (step-by-step)
Here’s the basic workflow I used on my first test shoot. You can adapt it whether you’re filming with a smartphone, a mirrorless camera, or an older DSLR.
Choose your TV: I like 24–32" OLEDs from brands like LG (their A-series) or Sony’s smaller models. They’re affordable and easy to position. If OLED is out of budget, look for local classifieds or refurbished units—older OLEDs often go cheap.Mounting and placement: Put the TV behind your actor, slightly off-axis. For a moody rim light, tilt it so the brightest part hits the edge of the face or shoulder. For full background, frame it behind the subject but keep at least a foot of distance to avoid flattening the scene.Source content: Use video loops or stills that help tell the visual story. I often use abstract gradients, moving bokeh, or a slow-motion city street loop. You can find free loops on Pexels, Videvo, or YouTube. Make sure the loop is high brightness and not too busy.Color grading in-camera: Reduce the TV’s brightness to avoid clipping and dial in the color temperature. I usually warm the TV slightly (think 3200–4000K) to mimic tungsten, or go cool (5600–6500K) for neon-night moods.Camera settings: Keep ISO low, widen the aperture for shallow depth (f/1.8–f/2.8), and adjust shutter speed to your frame rate. The shallow depth helps the TV blur into a pleasing bokeh instead of a distracting rectangle.Reflections and props: Get reflective surfaces in the frame—glasses, a glossy jacket, a window—to catch colored highlights from the TV. Those tiny reflections sell the cinematic vibe.Practical looks I’ve used
I’ve experimented with a few signature setups that are easy to recreate:
Neon pop: TV shows animated vertical gradients of magenta and teal. Place it at shoulder height behind the subject for twin rim lights. Great for music videos or edgy interviews.Soft window trick: Loop a slow cloud timelapse and place the TV outside a window (aim it inward). From inside, it reads like a diffused natural light source—cheaper than renting an HMI for a day.City drift: Use a slow-moving bokeh street loop and position the TV slightly out of focus behind your subject. Feels like a nighttime street scene without leaving your living room.Settings cheat-sheet
| TV size | 24–32" |
| Brightness | 30–60% (adjust to avoid clipping) |
| Color temp | 3200K (warm) – 6500K (cool), depending on mood |
| Distance from subject | 1–3 feet for rim light; 3–8 feet for background |
| Aperture | f/1.8–f/2.8 for shallow depth |
| ISO | Keep as low as possible (100–400) |
Common mistakes to avoid
My early attempts were embarrassing—like a low-budget music video that forgot the budget part. Avoid these pitfalls:
Too bright TV: It can blow out highlights and create an obvious rectangular glow. Dial it down.Busy or high-detail loops: If the TV content contains faces or recognizable scenes, your background competes with the actor. Abstract or subtly animated loops work best.No separation: If the subject is flush against the TV, you’ll lose depth. Add a few feet of space and maybe a soft fill light in front.Gear recommendations and budget hacks
Here’s what I typically use and where I cut corners:
TV: LG 27-inch OLED or older model OLEDs from local listings.Source: Any laptop, phone, or HDMI media player feeding the TV. I often use a Chromecast or an old Roku for looping videos from YouTube or local files.Tripod/stand: A cheap TV stand or a C-stand if you want precise angles. I’ve even used a cube shelf and a stack of books in a pinch.Backdrop and fill: Black curtains to control stray light; a small reflector for soft frontal fill (or a cheap LED panel with diffusion).When it’s not the right tool
This trick isn’t a magic wand. If you need super-wide, evenly lit backgrounds or extreme daylight realism, a single small TV won’t replace proper lights and set pieces. Also, if you’re shooting in very small rooms, the TV’s reflections can get messy. Use it as part of a toolkit, not the whole kit.
Final thoughts (but not a conclusion)
There’s a delightfully rebellious joy in making something look expensive with humble tools. The tiny OLED TV trick feels a bit like cinematic cosplay—you’re borrowing the visual language of high-budget films and translating it into something that fits on your coffee table. Play with color, movement, and distance, and you’ll find combinations that transform your cheap films into scenes that actually look like they came from a festival slate. If you try it, send me a clip—I'll absolutely double-tap and probably write a cheeky listicle about your setup.